I was not going to create a tutorial on how to make end grain cutting boards since there are so many available on YouTube, but I guess I changed my mind. I already track all of my work to reference at a later date, so creating a tutorial is fairly simple.
End grain cutting boards are a lot of fun to make and one of my favorite projects to complete. They look absolutely stunning, make great gifts for friends & family and are easier to sell than many other projects (like pens for instance). On top of that, end grain cutting boards are easier on knifes, as the knife edge slides between the grain instead of against. The Wood Whisperer has great insight on the benefits, cons, and step by step procedures HERE.
The design stage for me is simple. I like any style of end grain cutting board except for the simple two wood type checkered look. This is only a matter of opinion, but checkered cutting boards with only two types of wood are not aesthetically pleasing to me. My favorite cutting board is simple yet elegant, containing only one type of wood which can contain some sapwood showing many different shades of color. Below are two boards I made, one of all walnut and one of all hickory. Notice the color variation of the end grain.


My second favorite design is 3-4 different species of wood with different widths so there are no (or not much) checkered patterns. The board below is maple, cherry and hickory. The triangles are normal square pieces of hickory that contain sapwood.

For this tutorial, I will be showing how I made the all hickory cutting board.
1) First, select the wood you want to use for the cutting board and figure out your design. As stated, I am going with all hickory. For the design, I am going to use 1-1/2 inch wide pieces, 3/4 inch thick. Since its all the same species and sizes, I am not worried about design. If I had several different sizes and types of wood, I would create a design on the free cutting board designer program (CBdesigner) HERE.

2) Next, I planed down the board and cut them into manageable pieces. The pieces are 6 inches wide so I could utilize my 6 inch jointer. The boards are 3 feet long, but I know now that I should have made them 4 feet to get a longer cutting board.

3) I then cut the boards into 1-1/2 inch strips. I made enough strips to make a 12-inch board. For me, it must be 12 inches or less so the board can fit into my planer.

4) After cutting, you are ready for your first glue up. Using a dozen clamps, handful of calls and a quarter bottle of glue, I glued each piece (longways – Not standing up on end) together to make one large board. I use the wood whisperers method of gluing – Dry fit the pieces, flip them all 90 degrees so they are standing up except for the last piece, clamp them lightly, and apply glue with an ink roller. This method beats gluing each piece separately….


After 30 minutes to an hour, I carefully un-clamp the board and remove the excess glue with a chisel. Since the excess glue is not fully cured, it is a lot easier to clean now then to chip away at the glue a day or so later. It saves me about 30 minutes and unnecessary chips to the board, which would add more planer time and possibly thinner boards.

5) Now, I plane both sides of the board so there are no imperfections. I then put the board on my cross cutting sled to true up both ends

I then put the board on my cross cutting sled to true up both ends

Using the stop block method (Block clamped to my sled fence with a loose piece in between that’s pulled away to avoid pinching) I cut 1-1/4 inch strips out of my board. The bigger the cut, the thicker your cutting board will be. But keep in mind, the cutting board will be smaller as well. This is why I said earlier I should have had 4 feet of board to work with instead of 3 feet. You could also use your table saw fence, which I have done in the past.

6) Now that the pieces are cut, you can rearrange the strips to make different designs and appearances. I put the pieces together in 5 different arrangements before I found the one I liked:


The first four were a bit too cluttered for me, and I did not like the diamonds and squares that showed up. I tend to keep things simple, so I went with the following layout:
7) Final Glue up! Just like before, I glued the pieces together using a dozen clamps, a handful of calls and a quarter bottle of glue. The end gran should be upright, so the long grain is whats glued together.
8) Sanding – You have two options here. First, you can chug away with an orbital sander and belt sander until you get the result you are looking for. This takes hours, and is brutally difficult to achieve a completely straight board. When using this method, I use a straight edge to check the board for straightness, circle high and low points, and sand with 60 to 80 grit sandpaper until I get a clean, flat board.
Second option is buy or borrow a drum sander. Since my wife’s father has a drum sander, I am able to run my cutting boards through in 15 minutes. I prefer this option, 100 percent of the time.

9) Now, router the end to whatever profile you desire. I round them off slightly to create pleasing edges. You can also add handle notches with a router and a simple jig, but I usually choose not to. After I route all of the corners, I finish sand with an orbial sander to 120 or 150 grit sandpaper.

10) Just like the Wood Whisperer, I add 50% Mineral Spirits and 50% salad bowl finish from general finishes. I have used mineral oil before, but I really prefer the salad bowl finish. The Mineral Spirits thins the finish so it easily penetrates the wood grain. After applying a heavy first coat, the finish actually soaks through the entire board and is visible on the bottom. My first coat is extremely heavy, usually several applications on each side until the board cannot absorb anymore finish. After a day of curing, I add another coat, let it soak for 10 minutes and wipe off the excess material. I wait another day and apply the last coat.


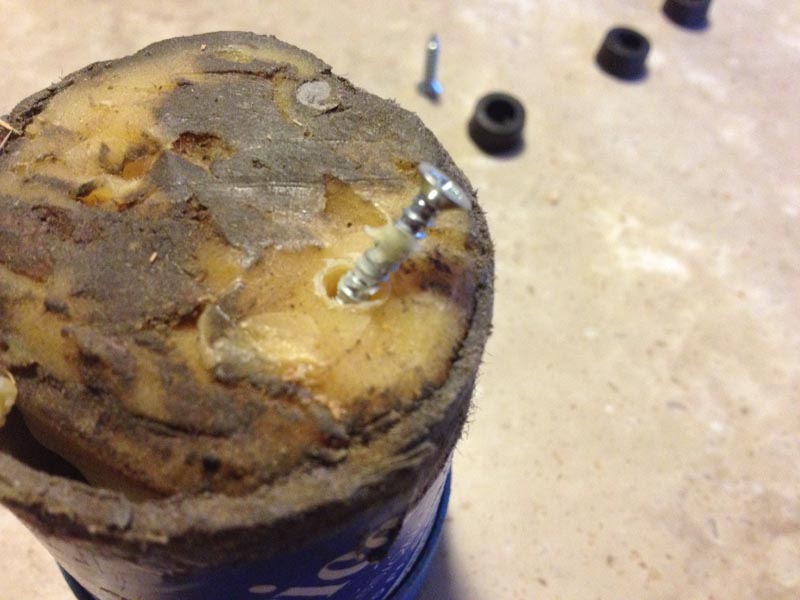
I then add rubber feet if my board contains any wobble. If it sits flat on your counter, the board is done.
This board rocks slightly, so feet it is.

When screwing into the end grain cutting board, I wax my screws so they easily penetrate the wood. I also pre-drill so no splitting occurs. I like to play it safe.

And finally, you are finished with your cutting board.


Chris

really cool!!
This looks great! Where did you get the rubber feet?
Home depot sells them for about 2-3 bucks. I only use them when my cutting board contains a little wobble due to poor sanding (It is really hard to sand end grain).