Concrete Countertops – A Quick How To
One project that brought me great joy was my maple bathroom vanity with a dark concrete countertop. This was my second “big” project that took as much time planning as it did constructing. I first created the entire vanity in Trimbles free sketchup program, and researched how to pour a concrete countertop for what seemed like months. Doing this enabled me to plan every connection point, get every measurement, and minimized in the field changes or quick fixes. Since this project, I have been using sketchup to plan all my major builds.
As you can see, I did a decent job sticking to the original plan.
Luckily for me, I took pictures along the way in case I wanted to build concrete counter tops in my kitchen at a later date (I ended up with solid surface).
The vanity itself was nothing special. A simple design with maple lumber and maple veneer plywood for the sides and back. A single door in the middle and shelves on each side for towels. Other highlights are tapered legs, no exposed fasteners thanks to pocket screws, and built sturdy as a rock.
How to construct your concrete countertop:
First, I constructed the form out of melamine coated MDF from Home Depot or Lowes. I made the form based off my vanity size, and figured 1-3/4 inches would be deep enough for the concrete top. You should always use melamine for the form so there is minimal sanding in the end, as your counter top is actually facing down in your form giving the top a smooth finish. Also, the melamine holds in moisture making the concrete cure at a slower rate – meaning stronger concrete.
After screwing the form together, I taped off the sides so I could install a nice clean bead of silicone caulk. This HAS to be 100% silicone so the concrete does not stick. Two reasons for this step is it makes the form water tight, and it gives the top a rounded corner. I also used the cut out template that came with the sink to make blocking out of rigid foam insulation. This will be knocked out after the concrete form cures so the sink can be dropped in.
After applying silicone caulk (black), I removed the tape and adhered my styrofoam cutout where the sink is going to go.
After the silicone hardens, it is time to mix the concrete. Instead of mixing a perfect blend of cement, sand, plasticisers, etc – Quickrete makes a countertop mix that has everything you need. It comes in white or gray, but I chose white and added charcoal dye. I believe the bags are around 8-10 dollars I needed (2) total. Just be advised that your local box store does not sell this product. Luckily, I have a concrete specialty store near Cleveland that carries this.
Here is the mix and dye all ready to go
I put a thin layer of concrete mix into my form, about half way. I then placed rebar and wire mesh for additional strength. Here is the layout of rebar I used (Wire mesh not shown). I was mostly concerned that the top would crack or break at the thin sections near the sink.
After the form was completely filled with concrete, I vibrated the form with a palm sander to get the air bubbles out. If I did this again, I would have wrapped a “back massager” in plastic and worked it into concrete. This would work a lot better than an orbital sander against your form.
Using a straight board, I leveled off the excess concrete. I tried to get this as smooth as possible, but as previously stated, the concrete you visually see is the bottom of your top.
I put plastic over my form so it would take longer to cure, which in theory makes your concrete stronger. I removed the plastic on a daily basis and poured water on the concrete to keep that moisture content up. Be sure you always put the plastic back.
After about a month or so, I flipped the form over and carefully removed the melamine coated mdf. Do this slowly as you do not want to chip an edge at this point. After removal of the florms, knock out your styrofoam.
After removing the forms, I noticed I had a bunch of air pockets and voids. I knew I should have used that “back massager” instead of the sander. To fill these holes, I bought a bag of portland cement from a box store and mixed it with water and charcoal dye. I wanted this mixture to be darker than my countertop to give it a rustic look. I then worked this watered down mixture into the pin holes.
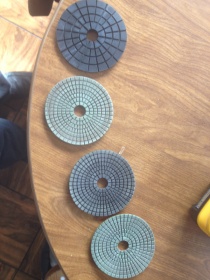
When the Portland mixture dried, I sanded & polished the top with a grinder and wet diamond sanding pads. I used grits from 800 to 3000 – This gave my top the glossy clean look I was going for.
Here is the finished top and backsplash before installation.
To finish this top, I applied “wet look” concrete sealer that was purchased from Home Depot or Lowes. Some people choose bees wax, but that option did not sound right for me. I wanted quick and durable.
I loved this project because it’s something I have never tried before. I would do it again for a small vanity or table top, but definitely not for my kitchen counters.


